1. Boards and Decking
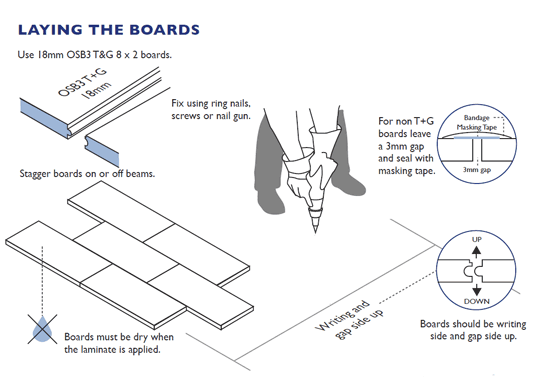
We recommend using only OSB3 T&G 18mm 8’x2’ boarding:
- T&G profile prevents the boards from distorting (or“dishing”) as the laminate cures
- T&G boards do not require an additional CSM ‘bandage’ on the joints
- T&G boarding saves time and materials
- T&G boards do not have to be joined on beams or noggins
- Used writing side up the fibreglass bond is much stronger than onto plywood
- No surface preparation is required (plywood must be sanded before applying laminate)
- 8x2 boards are easier to handle and to transport
Remember:
- OSB3 indicates that the board is suitable for external use. Use only boards specified as OSB3
- Writing side up! Note the small gap formed along the joints - resin will run into the gap and bond the boards together when the laminate is applied.
Availability:
All Matrix distributors (and some timber yards and builders’ merchants) stock 8x2 18mm OSB3 T&G boards and it is worth making every effort to find a local source. If you are unable to obtain them use 18mm OSB3 boards or WBP plywood.
If you use 8x4 square edge boards be prepared to:
- Leave a 3-4mm gap between each board edge (for internal movement and expansion)
- Vigorously abrade plywood to improve bond with 40-60 grit red aluminium oxide paper
- Apply masking tape to all joints to prevent resin ingress when the bandage is applied
- Apply an additional glass bandage (450g x 75mm) prior to the main 600g laminate
Note: The bandaged joint will be clearly visible on the finished surface of the laminate
Preparing the Deck
- We do not recommend using existing boards. A Premium GRP roofing application can only be guaranteed if the boards are new or replaced during a refurbishment
- Residues of bitumen left on the deck after the removal of a felt roof will create areas of under-cure and potential failure. Although small patches of bitumen can be neutralised using G4 it is better to remove and re-new contaminated boards and check the condition of the beams. Replace as required
- Check the fall of the roof. We recommend a minimum fall of 1:80. Add firing pieces as required
- If the beams have sagged the new GRP roof will pond. Ponding is best sorted out at the boarding stage! Trying to fill depressions on a finished roof is rarely successful so make sure the boards are fair and the fall is correct before you start laminating.
Remember:
- Boards must be completely dry when the laminate is applied
- Boards left overnight or longer must be securely protected from rain or moisture
- Do not prepare a deck in poor weather conditions or when the deck is likely to become damp
Laying T&G boards
- The boards should be laid at 90 degrees to the beams
- The boards should be laid in rows – end to end – and the short end joints staggered
- The boards do not need to be joined on beams or noggins
- Start at the edge furthest from (and opposite to) the drip edge and work towards the drip edge
- Leave an expansion gap of 25mm against walls and abutment walls to accommodate expansion
- Trim the last board in the row flush with the drip edge and use the off-cut to start the next row of boards (useable off-cuts must be longer than 400mm)
- Gently tap each board home with a wooden mallet to fully locate the T&G joint. Continue until the deck is fully assembled.
Fixings
- Boards should be fixed using a nail gun or electric screw driver
- Screws should be non-rusting (galvanised or sheradised)
- Fixings should penetrate at least 40mm into the joists
- 63mm galvanised ring nails can be used where there is no ceiling below (hammer blows will cause damage)
- Fix at 200mm centres (4 fixings per 600mm side)
Rebating the trim into the deck
The thickness of trim and additional CSM bandage may capture a small amount of standing water at the drip edge on the finished roof. Whilst this has no detrimental effect on the integrity of the roof you may wish to use an electric plane to form a trim/bandage rebate into the board (approx 2mm) to accommodate the trim and bandage.
Ply and PU insulation board
PU insulation is available with 6mm plywood glued to one side. Although It would seem reasonable to fix it PU side down and apply the GRP to the 6mm ply, as the resin cures it shrinks and the 6mm ply is not stiff enough to prevent curling and the panel will dish. If however you use it ply-side-down and fix an 18mm T&G OSB 3 board on top of the insulation (fixed through to the beams) you will be able to apply the laminate without distortion.
For more information see the Warm Roof construction section