6. How to Laminate
General Information
- Laminating is the application of a resin mix to a glass reinforcement (approximately in the ratio by weight of 3 parts resin to 1 part glass)
- To make 1m2 of laminate using 600gm mat you will need 1.8kg resin.
- Roughly check your quantities of resin to mat as you laminate.
- A successful laminate will be well consolidated (air free) and evenly bonded to the deck with a slightly resin-rich surface to prevent ‘pin holing’ (small holes forming in the surface of the laminate).
- A successful laminate will be translucent (can you see the writing on the boards?). There must be no resin-starved or dry patches of mat in the finished laminate.
- A successful laminate will have no stray fibres on the surface.
Stages of laminating
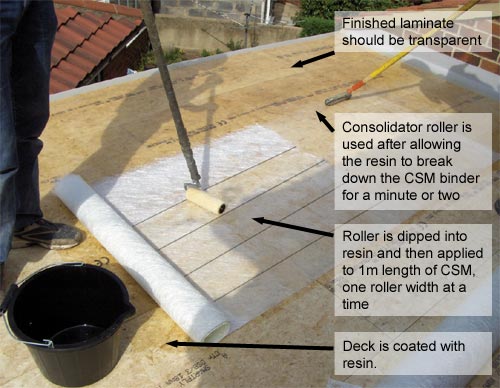
- Generously apply catalysed resin mix to the deck using a Matrix blue stripe resin application roller (a 6” roller fits into a 5L bucket although other sizes are available).
- For detailed work use plain handled paint brush.
- Apply the resin to the deck where you intend to laminate. At first we recommend you laminate sequentially in smaller areas - no more than 3m2
- Place pre-cut CSM onto the resin
- Apply more resin mix to the CSM. Again, be generous. Resin-rich is better than resin-starved.
- Allow mat and resin mix to dwell for about one minute to dissolve the mat binder.
- Consolidate the laminate (work the resin through the mat) and remove all air from the laminate using a paddle roller. Some light pressure is required to consolidate the laminate.
- Listen to the paddle roller – as the air leaves the laminate the sound or the roller will change. You will need at least 2-3 passes and possibly more.
- Use larger paddle rollers for large areas and small paddle rollers for details and bandaging
- Check that the laminate. Does it look right? Excess resin can be moved on to the next area with a final pass of a soft resin roller.
- The laminate should harden and reach the initial cure stage within an hour. Can you walk on it without disturbing the fibres? If so it is now ready for the topcoat.
Making a Test Piece
Before you begin a roof make a test piece at home in your garden or garage. Make a good quality laminate and apply a topcoat (see How to Apply Topcoat). A test piece will highlight any problems or misunderstandings you may have before you laminate a roof.
Using a wetting-out board
- Small areas of glass can be ‘wet out’ with resin mix on a sacrificial board and then hand-carried to where you wish to apply them – for example around a pipe or onto a pre-fabricated corner.
- The glass must be positioned before it disintegrates and finished with a brush or paddle roller
- Using a wetting out board saves time and ensures full wet-out of the glass
Cleaning tools
- Tools can be cleaned in acetone.
- Acetone must be kept in a sealed steel container
- With the exception of paddle rollers, roller handles and buckets we recommend regarding most laminating tools as disposables
- Resin and topcoat residues (when set) can be pulled from a polyethylene bucket and the bucket can be used many times. Coat the bucket sides with resin or topcoat mix to facilitate a cleaner removal
- The residue in the empty Premium containers should be catalysed with a resin mix and a brush. The containers can then be used as rubbish bins and legitimately scrapped to landfill (the raw resin having been converted to plastic).